- 浏览: 948594 次
-

文章分类
最新评论
Android中ICS4.0源码Launcher启动流程分析【android源码Launcher系列一】
大明原创,转载请标明出处:http://blog.csdn.net/wdaming1986/article/details/7585649
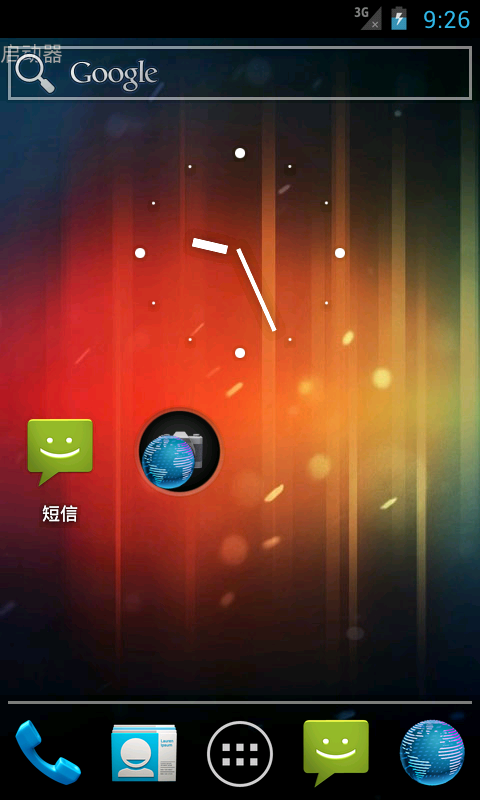
图(1)
上图是4.0的Launcher界面,下面我们分步来解析一下Launcher的启动过程。
Step 0:首先要给大家介绍一下Launcher的数据库,这个数据库中存放着待机界面的图标,主屏底部的应用程序图标和桌面folder中各应用程序的图标,ICS4.0的folder中只能放应用程序的快捷方式,shortcut不能放到这个folder中,先看截图:
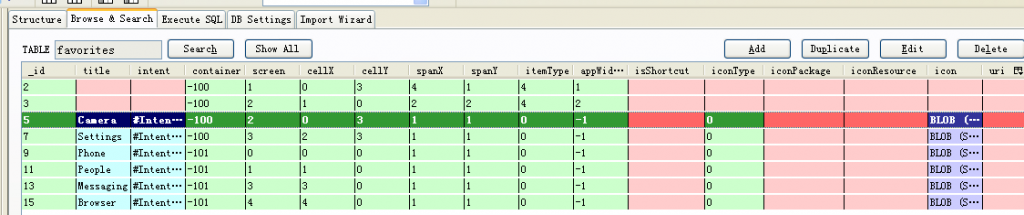
图(2)
说说各字段的含义:
title:表示桌面应用程序的名字,有的title为空,表示是widget的快捷方式;
intent:表示启动这个图标的intent放到数据库中,当click的时候就会调用这个字段,启动相应的应用程序;
container:表示应用程序的容器,folder的容器为整数,-100:表示在桌面的程序,-101:表示是主屏底部的程序;
screen:表示在第几个屏,folder的screen都是0, container=-101的为0,1,3,4;2为allapp的按钮;
cellX:表示在屏幕X轴的位置,(0,1,2,3),左上角为0点,往右依次增加;
cellY:表示在屏幕Y轴的位置,(0,1,2,3),左上角为0点,往下依次增加;
spallX:表示占X轴几个格;
spallY:表示占Y轴几个格;
itemType:应用程序用0表示,shortcut用1表示,folder用2表示,widget用4表示;
appWidgetId:-1表示不是widget,数字大于0表示才是widget;
isShortCut:值为0表示不是应用程序的ShortCut,值为1表示是应用程序的ShortCut;
iconType:值为0表示图标的名字被定义为包名的资源id,值为1表示图标用bitmap保存;
icon:表示应用程序的图标,二进制的;显示为一张图片;
说明:folder中的应用快捷方式绑定folder---->是用container的值绑定folder的id的;
详细的讲解请参考LauncherSettings.java这个类,有数据库字段的详细讲解;
手机是在第一次烧机完成后,数据库的值还没有,这时候launcher解析default_workspace.xml把这个值存到数据库中;所以说想定制什么样的开机桌面就在default_workspace.xml中做相应的配置,具体参照我前面的博客:
Android中源码Launcher主屏幕程序排列详解【安卓Launcher进化一】中有详细的介绍:
i f (!convertDatabase(db)) {
// Populate favorites table with initial favorites
loadFavorites(db, R.xml.default_workspace);
}
Step1:开机后先启动LauncherApplication.java这个类的onCreate()方法,下面看代码:
   @Override
    public void onCreate() {
        super.onCreate();

        // set sIsScreenXLarge and sScreenDensity *before* creating icon cache
        // 在创建图标缓存之前先设置sIsScreenXLarge和屏幕设备的分辨率
        final int screenSize = getResources().getConfiguration().screenLayout &
                Configuration.SCREENLAYOUT_SIZE_MASK;
        sIsScreenLarge = screenSize == Configuration.SCREENLAYOUT_SIZE_LARGE ||
            screenSize == Configuration.SCREENLAYOUT_SIZE_XLARGE;
        sScreenDensity = getResources().getDisplayMetrics().density;

        // 实例化图标缓存区的对象
        mIconCache = new IconCache(this);
        // 实例化一个LauncherModel对象,这个类是保存Launcher的内存启动状态,更新Launcher的数据库的作用
        mModel = new LauncherModel(this, mIconCache);

        // Register intent receivers
        // 注册监听,应用package增加,删除,改变的监听。
        IntentFilter filter = new IntentFilter(Intent.ACTION_PACKAGE_ADDED);
        filter.addAction(Intent.ACTION_PACKAGE_REMOVED);
        filter.addAction(Intent.ACTION_PACKAGE_CHANGED);
        filter.addDataScheme("package");
        registerReceiver(mModel, filter);
        filter = new IntentFilter();
        // 注册application是否可用,语言改变,方向改变的监听。4.0支持横竖屏
        filter.addAction(Intent.ACTION_EXTERNAL_APPLICATIONS_AVAILABLE);
        filter.addAction(Intent.ACTION_EXTERNAL_APPLICATIONS_UNAVAILABLE);
        filter.addAction(Intent.ACTION_LOCALE_CHANGED);
        filter.addAction(Intent.ACTION_CONFIGURATION_CHANGED);
        registerReceiver(mModel, filter);
        filter = new IntentFilter();
        filter.addAction(SearchManager.INTENT_GLOBAL_SEARCH_ACTIVITY_CHANGED);
        registerReceiver(mModel, filter);
        filter = new IntentFilter();
        filter.addAction(SearchManager.INTENT_ACTION_SEARCHABLES_CHANGED);
        registerReceiver(mModel, filter);

        // Register for changes to the favorites
        // 注册favorites应用程序数据库改变的监听
        ContentResolver resolver = getContentResolver();
        resolver.registerContentObserver(LauncherSettings.Favorites.CONTENT_URI, true,
                mFavoritesObserver);
    }
Step 2:在LauncherApplication.java中onTerminate()的方法,解除监听的绑定;
 /**
     * There's no guarantee that this function is ever called.
     */
    @Override
    public void onTerminate() {
        super.onTerminate();

        unregisterReceiver(mModel);

        ContentResolver resolver = getContentResolver();
        resolver.unregisterContentObserver(mFavoritesObserver);
    }
Step 3:Step1中的数据库mFavoritesObserver监听内部类如下:
   /**
     * Receives notifications whenever the user favorites have changed.
     */
    private final ContentObserver mFavoritesObserver = new ContentObserver(new Handler()) {
        @Override
        public void onChange(boolean selfChange) {
            mModel.startLoader(LauncherApplication.this, false);
        }
    };
Step 4: 接着我们来看看mModel.startLoader(LauncherApplication.this, false)的方法:
   public void startLoader(Context context, boolean isLaunching) {
        synchronized (mLock) {
            if (DEBUG_LOADERS) {
                Log.d(TAG, "startLoader isLaunching=" + isLaunching);
            }

            // Don't bother to start the thread if we know it's not going to do anything
            if (mCallbacks != null && mCallbacks.get() != null) {
                // If there is already one running, tell it to stop.
                // also, don't downgrade isLaunching if we're already running
                isLaunching = isLaunching || stopLoaderLocked();
                mLoaderTask = new LoaderTask(context, isLaunching);
                sWorkerThread.setPriority(Thread.NORM_PRIORITY);
                sWorker.post(mLoaderTask);
            }
        }
    }
Step 5:接着我们来看看LoaderTask.java的run()方法:
        public void run() {
            // Optimize for end-user experience: if the Launcher is up and // running with the
            // All Apps interface in the foreground, load All Apps first. Otherwise, load the
            // workspace first (default).
            final Callbacks cbk = mCallbacks.get();
            final boolean loadWorkspaceFirst = cbk != null ? (!cbk.isAllAppsVisible()) : true;

            keep_running: {
                // Elevate priority when Home launches for the first time to avoid
                // starving at boot time. Staring at a blank home is not cool.
                synchronized (mLock) {
                    if (DEBUG_LOADERS) Log.d(TAG, "Setting thread priority to " +
                            (mIsLaunching ? "DEFAULT" : "BACKGROUND"));
                    android.os.Process.setThreadPriority(mIsLaunching
                            ? Process.THREAD_PRIORITY_DEFAULT : Process.THREAD_PRIORITY_BACKGROUND);
                }
                if (loadWorkspaceFirst) {
                    if (DEBUG_LOADERS) Log.d(TAG, "step 1: loading workspace");
                    loadAndBindWorkspace();
                } else {
                    if (DEBUG_LOADERS) Log.d(TAG, "step 1: special: loading all apps");
                    loadAndBindAllApps();
                }

                if (mStopped) {
                    break keep_running;
                }

                // Whew! Hard work done.  Slow us down, and wait until the UI thread has
                // settled down.
                synchronized (mLock) {
                    if (mIsLaunching) {
                        if (DEBUG_LOADERS) Log.d(TAG, "Setting thread priority to BACKGROUND");
                        android.os.Process.setThreadPriority(Process.THREAD_PRIORITY_BACKGROUND);
                    }
                }
                waitForIdle();

                // second step
                if (loadWorkspaceFirst) {
                    if (DEBUG_LOADERS) Log.d(TAG, "step 2: loading all apps");
                    loadAndBindAllApps();
                } else {
                    if (DEBUG_LOADERS) Log.d(TAG, "step 2: special: loading workspace");
                    loadAndBindWorkspace();
                }

                // Restore the default thread priority after we are done loading items
                synchronized (mLock) {
                    android.os.Process.setThreadPriority(Process.THREAD_PRIORITY_DEFAULT);
                }
            }


            // Update the saved icons if necessary
            if (DEBUG_LOADERS) Log.d(TAG, "Comparing loaded icons to database icons");
            for (Object key : sDbIconCache.keySet()) {
                updateSavedIcon(mContext, (ShortcutInfo) key, sDbIconCache.get(key));
            }
            sDbIconCache.clear();

            // Clear out this reference, otherwise we end up holding it until all of the
            // callback runnables are done.
            mContext = null;

            synchronized (mLock) {
                // If we are still the last one to be scheduled, remove ourselves.
                if (mLoaderTask == this) {
                    mLoaderTask = null;
                }
            }
        }

        public void stopLocked() {
            synchronized (LoaderTask.this) {
                mStopped = true;
                this.notify();
            }
        }
加载桌面图标对应的数据库的值,这些值能把这些图标显示在屏幕上。
Step 6:LauncherApplication.onCreate()方法启动完成后,接着开始调用Launcher.java的onCreate()方法。代码如下:
    @Override
    protected void onCreate(Bundle savedInstanceState) {
        super.onCreate(savedInstanceState);
        // 得到LauncherApplication的对象app
        LauncherApplication app = ((LauncherApplication)getApplication());
        // 得到LauncherModel对象mModel,设置一个mCallbacks = new WeakReference<Callbacks>(callbacks)的
        // 回调callbacks
        mModel = app.setLauncher(this);
        // 得到图标缓存的对象mIconCache
        mIconCache = app.getIconCache();
        // 得到拖拽控制类DragController的对象
        mDragController = new DragController(this);
        // 得到一个LayoutInflater布局的对象
        mInflater = getLayoutInflater();

        // 得到一个AppWidgetManager的对象
        mAppWidgetManager = AppWidgetManager.getInstance(this);
        // 得到LauncherAppWidgetHost的一个对象
        mAppWidgetHost = new LauncherAppWidgetHost(this, APPWIDGET_HOST_ID);
        // Start receiving onAppWidgetChanged calls for your AppWidgets.
        mAppWidgetHost.startListening();

        if (PROFILE_STARTUP) {
            android.os.Debug.startMethodTracing(
                    Environment.getExternalStorageDirectory() + "/launcher");
        }

        // 检查Locale的语言级别,mcc, mnc的改变
        checkForLocaleChange();
        // 加载Launcher.xml布局文件
        setContentView(R.layout.launcher);
        // Launcher的布局的初始化
        setupViews();
        // 第一次启动Android的展示设置向导,
        // 这个SharedPreferences中存在
        // <boolean name="cling.workspace.dismissed" value="true" />
        // 如果值为true,则不显示设置向导,为false,则显示设置向导。
        showFirstRunWorkspaceCling();

        // 注册数据库观察者
        registerContentObservers();

        lockAllApps();

        mSavedState = savedInstanceState;
        restoreState(mSavedState);

        // Update customization drawer _after_ restoring the states
        if (mAppsCustomizeContent != null) {
            mAppsCustomizeContent.onPackagesUpdated();
        }

        if (PROFILE_STARTUP) {
            android.os.Debug.stopMethodTracing();
        }

        if (!mRestoring) {
            mModel.startLoader(this, true);
        }

        if (!mModel.isAllAppsLoaded()) {
            ViewGroup appsCustomizeContentParent = (ViewGroup) mAppsCustomizeContent.getParent();
            mInflater.inflate(R.layout.apps_customize_progressbar, appsCustomizeContentParent);
        }

        // For handling default keys
        mDefaultKeySsb = new SpannableStringBuilder();
        Selection.setSelection(mDefaultKeySsb, 0);

        // 注册系统对话框消失的监听
        IntentFilter filter = new IntentFilter(Intent.ACTION_CLOSE_SYSTEM_DIALOGS);
        registerReceiver(mCloseSystemDialogsReceiver, filter);

        boolean searchVisible = false;
        boolean voiceVisible = false;
        // If we have a saved version of these external icons, we load them up immediately
        // 如果我们已经保存了外部图标的版本,我们立即加载它们
        int coi = getCurrentOrientationIndexForGlobalIcons();
        if (sGlobalSearchIcon[coi] == null || sVoiceSearchIcon[coi] == null ||
                sAppMarketIcon[coi] == null) {
            updateAppMarketIcon();
            searchVisible = updateGlobalSearchIcon();
            voiceVisible = updateVoiceSearchIcon(searchVisible);
        }
        if (sGlobalSearchIcon[coi] != null) {
             updateGlobalSearchIcon(sGlobalSearchIcon[coi]);
             searchVisible = true;
        }
        if (sVoiceSearchIcon[coi] != null) {
            updateVoiceSearchIcon(sVoiceSearchIcon[coi]);
            voiceVisible = true;
        }
        if (sAppMarketIcon[coi] != null) {
            updateAppMarketIcon(sAppMarketIcon[coi]);
        }
        mSearchDropTargetBar.onSearchPackagesChanged(searchVisible, voiceVisible);

        // On large interfaces, we want the screen to auto-rotate based on the current orientation
        if (LauncherApplication.isScreenLarge() || Build.TYPE.contentEquals("eng")) {
            setRequestedOrientation(ActivityInfo.SCREEN_ORIENTATION_UNSPECIFIED);
        }
    }
Step 7:其中LauncherModel这个类中有个回调接口,具体定义如下:
 public interface Callbacks {
        public boolean setLoadOnResume();
        public int getCurrentWorkspaceScreen();
        public void startBinding();
        public void bindItems(ArrayList<ItemInfo> shortcuts, int start, int end);
        public void bindFolders(HashMap<Long,FolderInfo> folders);
        public void finishBindingItems();
        public void bindAppWidget(LauncherAppWidgetInfo info);
        public void bindAllApplications(ArrayList<ApplicationInfo> apps);
        public void bindAppsAdded(ArrayList<ApplicationInfo> apps);
        public void bindAppsUpdated(ArrayList<ApplicationInfo> apps);
        public void bindAppsRemoved(ArrayList<ApplicationInfo> apps, boolean permanent);
        public void bindPackagesUpdated();
        public boolean isAllAppsVisible();
        public void bindSearchablesChanged();
    }
public void initialize(Callbacks callbacks) {
synchronized (mLock) {
mCallbacks = new WeakReference<Callbacks>(callbacks);
}
}
这个callbacks就是定义的接口回调,具体实现是在Launcher.java中定义的,启动Launcher的过程中,这些实现是异步来实现的。还有Launcher.java的onResume()方法没有讲解,到这儿基本上Android的Launcher已经启动起来了,这个onResume()我研究后再更新。
欢迎各界同僚留言指正错误和拍砖!欢迎留言!


发表评论

相关推荐
android 定制 launcher 源码
android4.0 主界面源码 launcher
android4.0中Launcher2源码。
launcher源码(ADWlauncher+android4.0原生launcher)
android4.0 launcher源码
android4.0 launcher源码 可直接在Eclipse中运行 与其他launcher不冲突
android 4.0 Launcher2 源码
这是Android4.0中的Launcher源码。要需要者,请下载。
从android4.0源码中考出来的 launcher2的源码,谁需要谁下吧
android4.0 Launcher源码,压缩文件中含class文件,导入到eclipse后导入class文件就可以运行。
Android4.0的Launcher相比 2.X 有较大的变化,这里的4.0源码将对您研究Launcher提供一些参考和帮助
android 4.0 launcher分析
有部分代码已经注释,完美导入Eclipse
压缩包内是原生的android4.0 launcher代码
本项目是原生的Android 4.0 手机桌面源码 Eclipse版本,已修改包名为Launcher2,不与原来的系统桌面包名冲突。测试一切正常,编码utf-8导入的时候请注意。
4.0Launcher的源码,在项目中的library文件中包含了编译所需要的framework_intermediates,android-common_intermediates,core_intermediates的jar文件,项目还整合了android.support.v13.dreams.BasicDream.java这...
本代码是4.0 launcher 源码. 支持4.0 4.1 系统. 真机运行截图见 shoot.png. 如果您遇到麻烦请自己搭建android开发环境:linux系统,虚拟机,下载android源码 等.这将花费有经验的您几天时间. 迅速获得编译技术支持(如果...
android2.3 仿 4.0 launcher,没有wdiget,加入了最近应用程序,和下载的应用,导入压缩包里的jar.tar.gz的3个Jar文件即可
Android系统桌面Launcher3源码,可直接在Android Studio中编译。
Android项目源码-安卓Launcher原生桌面源码